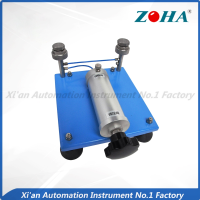
◎ Applications
HT-23 Pressure Calibrator is an important part of the digital pressure calibration system. The pressure calibrator produced by our company in sealing, pressure building and micro-adjustment etc parts are all at the forefront of similar products. According to the relevant national standards and the relevant standards of the Ministry of Machinery, after many tests, the pressure Calibrator produced by our company have exceeded several times of the relevant standards.
HT-23 Pressure Calibrator is pneumatic pressure source for calibrating pressure (differential pressure) transmitters, pressure sensors, pressure gauges and other pressure instruments.
◎ Characteristics
◆ Easy to operate and easy to maintain
◆ Fine-tuning, push-pull pressurization, remote transmission for verification instrument, minimal controllable high adjustment fineness
◆ Positive and negative pressure in one body, positive and negative pressure switching is convenient
◆ No leakage
◎ Technical data
◆Model: HT-23
◆Pressure range:( -60~60)kPa
◆Minimum controllable adjustment range: 0.1Pa
◆Volume: 245mm×165mm× 190mm
◆Weight: 2.5kg
◎ Instructions
Positive pressure verification: (The pressure will be stable when pressure reach to verification point and stabilizes for about 20 seconds.)
1.Turn on the pressure relief valve counterclockwise, exit the screw completely, Or withdraw a certain length according to the required pressure;
2.The trim valve is placed in the middle position;
3.Turn off the pressure relief valve clockwise;
4.Connect checked and standard instrument;
5.Clockwise (counterclockwise) rotate pressure regulating handle, make the pressure completely set at the verification point, fine adjustment with a trim valve, up to 0.1Pa.
6.Record the standard data and data of the point, the first verification point check ends.
7.Repeat steps 5-6, boost in turn, until the upper limit (full scale) of the inspected point, boost verification process finished.
When do buck verification process, only need to counterclockwise rotate pressure regulating handle or slightly open the pressure relief valve.
